Archive | February, 2013

Palachinke (Crepes)

26 Feb
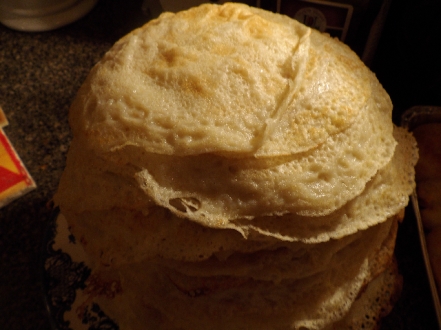
A stack of palacinke.

A stack of palacinke.

Palachinke are Serbian style crepes. They can be served plain or as a dessert wtih fruit or jam filling, a sprinking of brown sugar and cinnamon, toasted crushed walnuts, nutella, etc… or they can be made into savory crepes by filling with vegetables, cheese or even meat.  Enjoy!

The following recipe is from Lillian.

  • 1/2 tablespoon canola oil (more later for the frying pan)
  • 1 egg
  • pinch of sea salt
  • pinch of white sugar (optional)
  • all purpose flour, as required
  • water, as required
Batter cooking in the pan. In the background, the consistency fo the batter is evident.

Batter cooking in a small pan. In the background, the consistency of the batter is evident.

1. In a large bowl, beat egg, add in salt, oil and sugar.

2. Add in lukewarm water to the desired level depending on how many palachinka you wish to make.

3. Using a wooden spoon, begin by gradually whisking in 2 tablespoons of flour, then add more flour until batter mixture has a smooth creamy consistency. As a test, the mixture should fall in a continuous flow from the spoon but not be too thin.

4. Allow the batter to rest for at least 30 minutes (or up to overnight) in the fridge. The consistency of the batter will become even smoother and creamier.

5. Heat a small non stick frying pan on medium heat.

6. Add 1/3 tsp canola oil. Spread oil around pan.

7. Pour enough batter to thinly coat the entire pan.  Swirl the pan around in order to spread the batter.

8. Once the palachinke comes loose from the bottom of the pan, flip over and cook for another 20 seconds or so.

9. Dish palachinke onto a plate and repeat steps 6 to 9 until batter is used up.

Thank you to Lillian for sharing her family recipe and photos!

A stack of palacinke.

A stack of palacinke.

Food Safety Tips

19 Feb

FoodTips

I recently read an informative article on suggestions for food safety. The article begins from the time you purchase your items to the clean up after the meal is over. Many of the suggested ideas are simple and easy-to-implement. The full article can be found in the February 2013 edition of Canadian Health and Lifestyle. Below are some highlights from the story. Find the complete article here.

1. Make grocery shopping your last stop and head immediately home afterwards.

2. Begin your shopping in the household and dry foods department. Leave the frozen and refridgerated foods last.

3. Keep cold foods as far away as possible from hot foods in the cart (and in the car).

4. When checking out, put raw meats, poultry and fish in separate bags.

5. In the summer, keep a cooler in your trunk and place cold and frozen items in there.

6. Unpack your groceries immediately upon arriving home.

7. Store raw meats and poultry in the coldest part of your fridge (the back) and use within two or three days, otherwise freeze for up to three months.

8. Do not store perishables, such as eggs or dairy, in the door portion of your fridge. This is the warmst part of your fridge.

9. Always thaw frozen items in the refrigerator or on defrost in the mircowave.

10. Thoroughly wash hands with soap before and during food preparation and cooking.

11. Use separate cutting boards and knifes for raw items and fresh items.

12. Transfer leftovers into small shallow food safe containers. Label items with the date and a brief description. Allow leftovers to cool before placing in the fridge.

13. Lastly, “if in doubt, throw it out.”

Peanut Butter Cookies

12 Feb
Peanut butter cookies.

Peanut butter cookies.

The following recipe makes approximately 18 peanut butter cookies:

  • 1/2 cup unsalted butter, softened to room temperature
  • 1/2 cup all natural peanut butter, softened to room temperature
  • 1/2 cup white sugar
  • 1/2 cup brown sugar*
  • 1 large egg, beaten
  • 1 + 1/4 cup all purpose flour
  • 1/2 tsp baking powder
  • 3/4 tsp baking soda
  • 3/4 tsp real vanilla extract
  • 1/4 tsp cinnamon
  • 1/4 tsp salt
Cookie dough.

Cookie dough.

1. In a large mixing bowl, combine butter, peanut butter, sugars, egg and vanilla.  Mix well.

2. In a separate bowl, sieve  together flour, baking powder, baking soda, cinnamon and salt.

3. Gradually add dry ingredients to wet ingredients. Combine thoroughly.

(3b. At this point, feel free to jazz your cookies by adding chocolate chips, shredded cocout, colourful smarties, silvered almonds, etc.)

4. Form balls of dough approximately 1.5 inches in diameter.

5. Place on a lined baking sheet approximately 1 inch apart.

6. Gently flatten dough balls with a fork, then rotate fork 90º and genlty flatten one more time. This will make a criss cross pattern on each cookie.

Cookies immediately before placing in the oven.

Cookies immediately before placing in the oven.

7. Bake in a preheated 375º oven for 11 to 12 minutes.

8. Let cool for a few minutes before eating.

*The brown sugar makes moist soft cookies, so if you prefer more crunchy crisp peanut butter cookies, reduce the amount of brown sugar by replacing with an equal amount of white sugar.

Cookies immediately after baking. Two thumbs up from the cookie mascot.

Cookies immediately after baking. Two thumbs up from the cookie mascot.

Spiced Baked Chicken

5 Feb
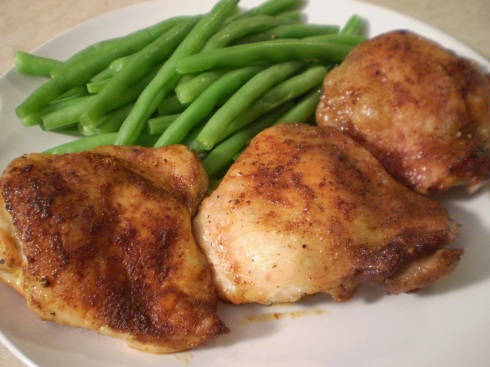
Season chicken thighs, baked.

Season chicken thighs, baked. Served with steamed green beans.

  • chicken thighs, trim fat, leave skin on
  • a few slices of garlic

For each chicken thigh, season with approximately

  • 1/4 tsp sugar 
  • 1/2 tsp paprika
  • 1/4 tsp sea salt
  • 1/4 freshly ground pepper
  • 1/4 tsp extra virgin olive oil

1. Massage spices (paprika, salt and pepper) into each chicken thigh.

2. Place 2 to 3 pieces of garlic slices underneath the skin of each chicken.

3. Rub oil on the bottom of each chicken.

4. Sprinkle sugar on top of each chicken.

5. Place chicken in baking dish.

6. Bake in a preheated 375º oven for 30 minutes. Then turn down temperature to 350º and bake for an additional 15 to 20 minutes.